Build Apache Kafka Consumer application
use case:
You’d like to integrate an Apache KafkaConsumer in your event-driven application, but you’re not sure where to start. In this tutorial you’ll build a small application reading records from Kafka with a Kafka Consumer. You can use the code in this tutorial as an example of how to use an Apache Kafka consumer.
Steps:
To get started, make a new directory anywhere you’d like for this project:
mkdir kafka-consumer-application && cd kafka-consumer-applicationNext, create the following docker-compose.yml file to obtain Confluent Platform:
---version: '2'services: zookeeper: image: confluentinc/cp-zookeeper:6.1.0 hostname: zookeeper container_name: zookeeper ports: - "2181:2181" environment: ZOOKEEPER_CLIENT_PORT: 2181 ZOOKEEPER_TICK_TIME: 2000 broker: image: confluentinc/cp-kafka:6.1.0 hostname: broker container_name: broker depends_on: - zookeeper ports: - "29092:29092" environment: KAFKA_BROKER_ID: 1 KAFKA_ZOOKEEPER_CONNECT: 'zookeeper:2181' KAFKA_LISTENER_SECURITY_PROTOCOL_MAP: PLAINTEXT:PLAINTEXT,PLAINTEXT_HOST:PLAINTEXT KAFKA_ADVERTISED_LISTENERS: PLAINTEXT://broker:9092,PLAINTEXT_HOST://localhost:29092 KAFKA_OFFSETS_TOPIC_REPLICATION_FACTOR: 1 KAFKA_GROUP_INITIAL_REBALANCE_DELAY_MS: 0 KAFKA_TOOLS_LOG4J_LOGLEVEL: ERRORAnd launch it by running:
docker-compose up -dIn this step we’re going to create a topic for use during this tutorial.
But first, you’re going to open a shell on the broker docker container.
Open a new terminal and window then run this command:
docker-compose exec broker bashNow use the following command to create the topic:
kafka-topics --create --topic input-topic --bootstrap-server broker:9092 --replication-factor 1 --partitions 1Keep this terminal window open as you’ll need to run a console-producer in a few steps.
Create the following Gradle build file, named build.gradle for the project:
buildscript { repositories { mavenCentral() } dependencies { classpath "com.commercehub.gradle.plugin:gradle-avro-plugin:0.22.0" classpath "com.github.jengelman.gradle.plugins:shadow:4.0.2" }}plugins { id "java" id "com.google.cloud.tools.jib" version "3.1.1" id "idea" id "eclipse"}sourceCompatibility = "1.8"targetCompatibility = "1.8"version = "0.0.1"repositories { mavenCentral() maven { url "https://packages.confluent.io/maven" }}apply plugin: "com.github.dpq.shadow"dependencies { implementation "org.slf4j:slf4j-simple:1.7.30" implementation "org.apache.kafka:kafka-streams:2.7.0" testImplementation "junit:junit:4.13.2" testImplementation 'org.hamcrest:hamcrest:2.2'}test { testLogging { outputs.upToDateWhen { false } showStandardStreams = true exceptionFormat = "full" }}jar { manifest { attributes( "Class-Path": configurations.compileClasspath.collect { it.getName() }.join(" "), "Main-Class": "io.confluent.developer.KafkaConsumerApplication" ) }}shadowJar { archiveBaseName = "kafka-consumer-application-standalone" archiveClassifier = ''}And be sure to run the following command to obtain the Gradle wrapper:
gradle wrapperNext, create a directory for configuration data:
mkdir configurationThen create a development configuration file at configuration/dev.properties:
# Consumer propertiesbootstrap.servers=localhost:29092key.deserializer=org.apache.kafka.common.serialization.StringDeserializervalue.deserializer=org.apache.kafka.common.serialization.StringDeserializermax.poll.interval.ms=300000enable.auto.commit=trueauto.offset.reset=earliestgroup.id=consumer-application# Application specific propertiesfile.path=consumer-records.outinput.topic.name=input-topicinput.topic.partitions=1input.topic.replication.factor=1Let’s do a quick overview of some of the more important properties here:
The key.deserializer and value.deserializer properties provide a class implementing the Deserializer interface for converting byte arrays into the expected object type of the key and value respectively.
The max.poll.interval.ms is the maximum amount of time a consumer may take between calls to Consumer.poll(). If a consumer instance takes longer than the specified time, it’s considered non-responsive and removed from the consumer-group triggering a rebalance.
Setting enable.auto.commit configuration to true enables the Kafka consumer to handle committing offsets automatically for you. The default setting is true, but it’s included here to make it explicit. When you enable auto commit, you need to ensure you’ve processed all records before the consumer calls poll again. Once there is a subsequent call to poll, all the records returned from the previous call are considered processed and the consumer commits the offsets.
auto.offset.reset – If a consumer instance can’t locate any offsets for its topic-partition assignment(s), it will resume processing from the earliest available offset.
group.id – Kafka uses the concept of a consumer-group which is used to represent a logical single group. A consumer-group can be made up of multiple members all sharing the same group.id configuration. As members leave or join the consumer-group, the group-coordinator triggers a rebalance which causes topic-partition reassignment among active members of the group.
Create a directory for the Java files in this project:
mkdir -p src/main/java/io/confluent/developerTo complete this tutorial, you’ll build a main application class and a helper class
First, you’ll create the main application,KafkaConsumerApplication, which is the focal point of this tutorial; consuming records from a Kafka topic.
Let’s go over some of the key parts of the KafkaConsumerApplication starting with the constructor:
public KafkaConsumerApplication(final Consumer<String, String> consumer, final ConsumerRecordsHandler<String, String> recordsHandler) { this.consumer = consumer; this.recordsHandler = recordsHandler;}Here you’re supplying instances of the Consumer and ConsumerRecordsHandler via constructor parameters. |
By using interfaces vs. concrete implementations you can more easily test the KafkaConsumerApplication class by swapping in a MockConsumer for the test. We’ll cover testing in an upcoming section. Also, interfaces make it simple to change ConsumerRecord handling at run-time.
In this tutorial you’ll inject the dependencies in the KafkaConsumerApplication.main() method, but in practice you may want to use a dependency injection framework library, such as the Spring Framework.
Next, let’s review the KafkaConsumerApplication.runConsumer() method, which provides the core functionality of this tutorial.
public void runConsume(final Properties consumerProps) { try { consumer.subscribe(Collections.singletonList(consumerProps.getProperty("input.topic.name"))); while (keepConsuming) { final ConsumerRecords<String, String> consumerRecords = consumer.poll(Duration.ofSeconds(1)); recordsHandler.process(consumerRecords); } } finally { consumer.close(); } }| Subscribing to the Kafka topic. | |
Using an instance variable keepConsuming to run the Kafka consumer indefinitely. The KafkaConsumerApplication.shutdown() method sets keepConsuming to false. | |
Polling for new records, waiting at most one second for new records. The Consumer.poll() method may return zero results. The consumer is expected to call poll() again within five minutes, from the max.poll.interval.ms config described in step three, “Configure the project”. | |
Handing off the polled ConsumerRecords to the ConsumerRecordsHandler interface. | |
Closing the consumer is essential to prevent resource leaking, hence the finally block. |
Now go ahead and create the src/main/java/io/confluent/developer/KafkaConsumerApplication.java file:
package io.dpq.developer;import java.io.FileInputStream;import java.io.IOException;import java.nio.file.Paths;import java.time.Duration;import java.util.Collections;import java.util.Properties;import org.apache.kafka.clients.consumer.Consumer;import org.apache.kafka.clients.consumer.ConsumerRecords;import org.apache.kafka.clients.consumer.KafkaConsumer;public class KafkaConsumerApplication { private volatile boolean keepConsuming = true; private ConsumerRecordsHandler<String, String> recordsHandler; private Consumer<String, String> consumer; public KafkaConsumerApplication(final Consumer<String, String> consumer, final ConsumerRecordsHandler<String, String> recordsHandler) { this.consumer = consumer; this.recordsHandler = recordsHandler; } public void runConsume(final Properties consumerProps) { try { consumer.subscribe(Collections.singletonList(consumerProps.getProperty("input.topic.name"))); while (keepConsuming) { final ConsumerRecords<String, String> consumerRecords = consumer.poll(Duration.ofSeconds(1)); recordsHandler.process(consumerRecords); } } finally { consumer.close(); } } public void shutdown() { keepConsuming = false; } public static Properties loadProperties(String fileName) throws IOException { final Properties props = new Properties(); final FileInputStream input = new FileInputStream(fileName); props.load(input); input.close(); return props; } public static void main(String[] args) throws Exception { if (args.length < 1) { throw new IllegalArgumentException( "This program takes one argument: the path to an environment configuration file."); } final Properties consumerAppProps = KafkaConsumerApplication.loadProperties(args[0]); final String filePath = consumerAppProps.getProperty("file.path"); final Consumer<String, String> consumer = new KafkaConsumer<>(consumerAppProps); final ConsumerRecordsHandler<String, String> recordsHandler = new FileWritingRecordsHandler(Paths.get(filePath)); final KafkaConsumerApplication consumerApplication = new KafkaConsumerApplication(consumer, recordsHandler); Runtime.getRuntime().addShutdownHook(new Thread(consumerApplication::shutdown)); consumerApplication.runConsume(consumerAppProps); }}To complete this tutorial, you’ll need to also create an interface for a helper class.
First create the interface at src/main/java/io/confluent/developer/ConsumerRecordsHandler.java
package io.dpq.developer;import org.apache.kafka.clients.consumer.ConsumerRecords;public interface ConsumerRecordsHandler<K, V> { void process(ConsumerRecords<K, V> consumerRecords);}Using an interface will make it easier to change how you want to work with ConsumerRecords without having to modify all of your existing code.
Next you’ll create an implementation of the ConsumerRecordsHandler interface named FileWritingRecordsHandler, but before you do that, let’s take a peek under the hood to understand how the helper class works.
The FileWritingRecordsHandler is a simple class that writes values of consumed records to a file, it’s worth a quick review of the process method:
@Override public void process(final ConsumerRecords<String, String> consumerRecords) { final List<String> valueList = new ArrayList<>(); consumerRecords.forEach(record -> valueList.add(record.value())); if (!valueList.isEmpty()) { try { Files.write(path, valueList, StandardOpenOption.CREATE, StandardOpenOption.WRITE, StandardOpenOption.APPEND); } catch (IOException e) { throw new RuntimeException(e); } } }Iterate over all of the records and store each record’s value in a List | |
If the List isn’t empty, let’s do something! | |
Pass the List<String> of records to the Files.write() method |
In practice you’re certain to do a more realistic workload.
Now go ahead and create the src/main/java/io/confluent/developer/FileWritingRecordsHandler.java file:
package io.dpq.developer;import java.io.IOException;import java.nio.file.Files;import java.nio.file.Path;import java.nio.file.StandardOpenOption;import java.util.ArrayList;import java.util.List;import org.apache.kafka.clients.consumer.ConsumerRecords;public class FileWritingRecordsHandler implements ConsumerRecordsHandler<String, String> { private final Path path; public FileWritingRecordsHandler(final Path path) { this.path = path; } @Override public void process(final ConsumerRecords<String, String> consumerRecords) { final List<String> valueList = new ArrayList<>(); consumerRecords.forEach(record -> valueList.add(record.value())); if (!valueList.isEmpty()) { try { Files.write(path, valueList, StandardOpenOption.CREATE, StandardOpenOption.WRITE, StandardOpenOption.APPEND); } catch (IOException e) { throw new RuntimeException(e); } } }}In your terminal, run:
./gradlew shadowJarNow that you have an uberjar for the KafkaConsumerApplication, you can launch it locally. When you run the following, the prompt won’t return, because the application will run until you exit it. There is always another message to process, so streaming applications don’t exit until you force them.
java -jar build/libs/kafka-consumer-application-standalone-0.0.1.jar configuration/dev.propertiesUsing the terminal window you opened in step three, run the following command to start a console-producer:
kafka-console-producer --topic input-topic --bootstrap-server broker:9092Each line represents input data for the KafkaConsumer application. To send all of the events below, paste the following into the prompt and press enter:
the quick brown foxjumped overthe lazy dogGo to Kafka SummitAll streams leadto KafkaYour consumer application should have consumed all the records sent and written them out to a file.
In a new terminal, run this command to print the results to the console:
cat consumer-records.outYou should see something like this:
the quick brown foxjumped overthe lazy dogGo to Kafka SummitAll streams leadto KafkaTest it
First, create a test file at configuration/test.properties:
input.topic.name=input-topicinput.topic.partitions=1input.topic.replication.factor=1Create a directory for the tests to live in:
mkdir -p src/test/java/io/confluent/developerTesting a Kafka consumer application is not too complicated thanks to the MockConsumer.java. Since the KafkaConsumer is well tested, we don’t need to use a live consumer and Kafka broker. We can simply use mock consumer to process some data you’ll feed into it.
There is only one method in KafkaConsumerApplicationTest annotated with @Test, and that is consumerTest(). This method actually runs your KafkaConsumerApplication with the mock consumer.
Now create the following file at src/test/java/io/confluent/developer/KafkaConsumerApplicationTest.java.
package io.dpq.developer;import static org.hamcrest.MatcherAssert.assertThat;import static org.hamcrest.Matchers.equalTo;import java.nio.file.Files;import java.nio.file.Path;import java.util.Arrays;import java.util.Collections;import java.util.HashMap;import java.util.List;import java.util.Map;import java.util.Properties;import org.apache.kafka.clients.consumer.ConsumerRecord;import org.apache.kafka.clients.consumer.MockConsumer;import org.apache.kafka.clients.consumer.OffsetResetStrategy;import org.apache.kafka.common.TopicPartition;import org.junit.Test;public class KafkaConsumerApplicationTest { private final static String TEST_CONFIG_FILE = "configuration/test.properties"; @Test public void consumerTest() throws Exception { final Path tempFilePath = Files.createTempFile("test-consumer-output", ".out"); final ConsumerRecordsHandler<String, String> recordsHandler = new FileWritingRecordsHandler(tempFilePath); final Properties testConsumerProps = KafkaConsumerApplication.loadProperties(TEST_CONFIG_FILE); final String topic = testConsumerProps.getProperty("input.topic.name"); final TopicPartition topicPartition = new TopicPartition(topic, 0); final MockConsumer<String, String> mockConsumer = new MockConsumer<>(OffsetResetStrategy.EARLIEST); final KafkaConsumerApplication consumerApplication = new KafkaConsumerApplication(mockConsumer, recordsHandler); // the KafkaConsumerApplication runs synchronously so the test needs to run // the application in its own thread new Thread(() -> consumerApplication.runConsume(testConsumerProps)).start(); Thread.sleep(500); addTopicPartitionsAssignmentAndAddConsumerRecords(topic, mockConsumer, topicPartition); Thread.sleep(500); consumerApplication.shutdown(); final List<String> expectedWords = Arrays.asList("foo", "bar", "baz"); List<String> actualRecords = Files.readAllLines(tempFilePath); assertThat(actualRecords, equalTo(expectedWords)); } private void addTopicPartitionsAssignmentAndAddConsumerRecords(final String topic, final MockConsumer<String, String> mockConsumer, final TopicPartition topicPartition) { final Map<TopicPartition, Long> beginningOffsets = new HashMap<>(); beginningOffsets.put(topicPartition, 0L); mockConsumer.rebalance(Collections.singletonList(topicPartition)); mockConsumer.updateBeginningOffsets(beginningOffsets); addConsumerRecords(mockConsumer,topic); } private void addConsumerRecords(final MockConsumer<String, String> mockConsumer, final String topic) { mockConsumer.addRecord(new ConsumerRecord<>(topic, 0, 0, null, "foo")); mockConsumer.addRecord(new ConsumerRecord<>(topic, 0, 1, null, "bar")); mockConsumer.addRecord(new ConsumerRecord<>(topic, 0, 2, null, "baz")); }}Now let’s build a test for the ConsumerRecordsHandler implementation used in your application. Even though we have a test for the KafkaConsumerApplication, it’s important that you can test this helper class in isolation.
Create the following file at src/test/java/io/confluent/developer/FileWritingRecordsHandlerTest.java.
package io.dpq.developer;import static org.hamcrest.MatcherAssert.assertThat;import static org.hamcrest.Matchers.equalTo;import java.io.IOException;import java.nio.file.Files;import java.nio.file.Path;import java.util.ArrayList;import java.util.Arrays;import java.util.HashMap;import java.util.List;import java.util.Map;import org.apache.kafka.clients.consumer.ConsumerRecord;import org.apache.kafka.clients.consumer.ConsumerRecords;import org.apache.kafka.common.TopicPartition;import org.junit.Test;public class FileWritingRecordsHandlerTest { @Test public void testProcess() throws IOException { final Path tempFilePath = Files.createTempFile("test-handler", ".out"); try { final ConsumerRecordsHandler<String, String> recordsHandler = new FileWritingRecordsHandler(tempFilePath); recordsHandler.process(createConsumerRecords()); final List<String> expectedWords = Arrays.asList("it's but", "a flesh wound", "come back"); List<String> actualRecords = Files.readAllLines(tempFilePath); assertThat(actualRecords, equalTo(expectedWords)); } finally { Files.deleteIfExists(tempFilePath); } } private ConsumerRecords<String, String> createConsumerRecords() { final String topic = "test"; final int partition = 0; final TopicPartition topicPartition = new TopicPartition(topic, partition); final List<ConsumerRecord<String, String>> consumerRecordsList = new ArrayList<>(); consumerRecordsList.add(new ConsumerRecord<>(topic, partition, 0, null, "it's but")); consumerRecordsList.add(new ConsumerRecord<>(topic, partition, 0, null, "a flesh wound")); consumerRecordsList.add(new ConsumerRecord<>(topic, partition, 0, null, "come back")); final Map<TopicPartition, List<ConsumerRecord<String, String>>> recordsMap = new HashMap<>(); recordsMap.put(topicPartition, consumerRecordsList); return new ConsumerRecords<>(recordsMap); }}Now run the test, which is as simple as:
./gradlew testTake it to production
First, create a new configuration file at configuration/prod.properties with the following content. Be sure to fill in the addresses of your production hosts and change any other parameters that make sense for your setup.
application.id=kafka-consumer-applicationbootstrap.servers=<<FILL ME IN>>schema.registry.url=<<FILL ME IN>>example.topic.name=<<FILL ME IN>>example.topic.partitions=<<FILL ME IN>>example.topic.replication.factor=<<FILL ME IN>>In your terminal, execute the following to invoke the Jib plugin to build an image:
gradle jibDockerBuild --image=io.confluent.developer/kafka-consumer-application-join:0.0.1Finally, launch the container using your preferred container orchestration service. If you want to run it locally, you can execute the following:
docker run -v $PWD/configuration/prod.properties:/config.properties io.confluent.developer/kafka-consumer-application-join:0.0.1 config.propertiesDeploy on Confluent Cloud
Instead of running a local Kafka cluster, you may use Confluent Cloud, a fully-managed Apache Kafka service.
- Sign up for Confluent Cloud, a fully-managed Apache Kafka service.
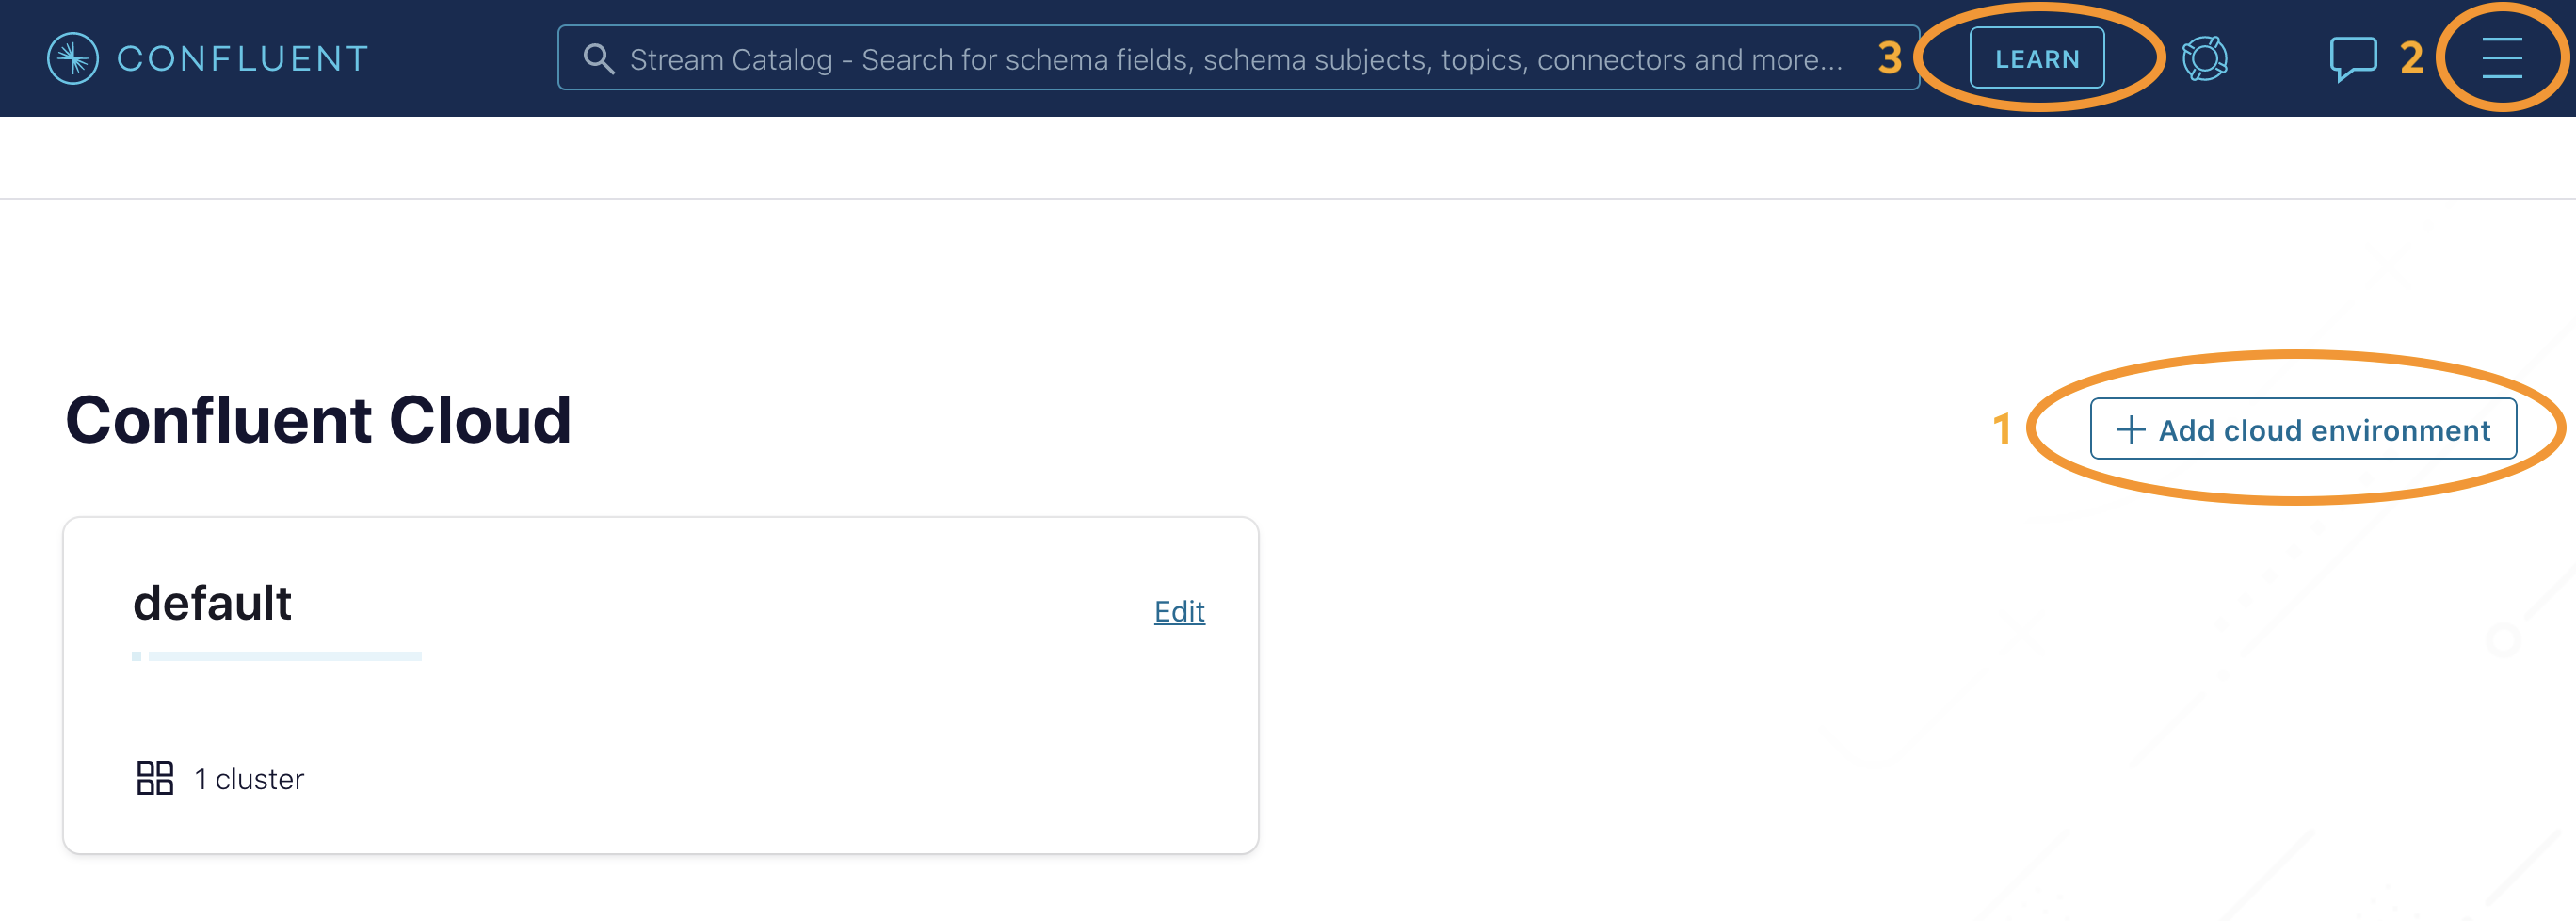
- After you log in to Confluent Cloud, click on
Add cloud environmentand name the environmentlearn-kafka. Using a new environment keeps your learning resources separate from your other Confluent Cloud resources. - From the
Billing & paymentsection in the Menu, apply the promo codeCC100KTSto receive an additional $100 free usage on Confluent Cloud.
Next, from the Confluent Cloud UI, click on Clients to get the cluster-specific configurations, e.g. Kafka cluster bootstrap servers and credentials, Confluent Cloud Schema Registry and credentials, etc., and set the appropriate parameters in your client application. In the case of this tutorial, add the following properties to the client application’s input properties file, substituting all curly braces with your Confluent Cloud values.
# Required connection configs for Kafka producer, consumer, and adminbootstrap.servers={{ BROKER_ENDPOINT }}security.protocol=SASL_SSLsasl.jaas.config=org.apache.kafka.common.security.plain.PlainLoginModule required username='{{ CLUSTER_API_KEY }}' password='{{ CLUSTER_API_SECRET }}';sasl.mechanism=PLAIN# Required for correctness in Apache Kafka clients prior to 2.6client.dns.lookup=use_all_dns_ips# Best practice for Kafka producer to prevent data lossacks=all# Required connection configs for Confluent Cloud Schema Registryschema.registry.url=https://{{ SR_ENDPOINT }}basic.auth.credentials.source=USER_INFOschema.registry.basic.auth.user.info={{ SR_API_KEY }}:{{ SR_API_SECRET }}Now you’re all set to run your streaming application locally, backed by a Kafka cluster fully managed by Confluent Cloud.

